How to Render Photorealistic SketchUp Models with the VizBase Plugin
The Vizbase SketchUp plugin lives inside the SketchUp viewport. You position a camera in your model, open the Vizbase panel, capture the view, and a photorealistic render comes back in the same panel — no exporting, no scene setup, no GPU workstation. This walkthrough covers the install, the first-render workflow, and the workflow tweaks that make the difference between a generic AI render and a render you can actually send to a client.
If you're still deciding between Vizbase and other AI rendering tools for SketchUp, read our honest comparison of seven SketchUp AI rendering toolsfirst. This post assumes you've already chosen Vizbase and want to know how the plugin actually works.
Why a SketchUp plugin matters
Almost every other AI rendering tool on the market — mnml.ai, MyArchitectAI, ArchiVinci, Visoid — works the same way: you export a screenshot from SketchUp, switch to a browser, upload, wait, download. It works. But it's four extra steps every time you want a render, and those steps add up over a day of client iteration.
The plugin removes the export, the upload, and the context-switch. You stay in SketchUp the whole time. Your camera stays put. Your model stays loaded. The plugin captures the current view directly, sends it to the Vizbase cloud, and the photorealistic render appears next to the original — all inside the SketchUp window. For junior staff, that's one tool to learn instead of two.
What the plugin sends is a flat image of the current view, the same kind of image you would export by hand, so the render itself is no different from an upload. The gain is the export step and the context switch you skip on every iteration.
Installing the plugin in four steps
The plugin ships as a single .rbz file and installs through SketchUp's Extension Manager. The whole process takes under two minutes.
- Download the .rbz filefrom your Vizbase dashboard. The plugin is available from the Starter tier and above — sign up for the free tier first if you want to evaluate Vizbase's output before committing.
- Open SketchUp (2021 and newer are supported on macOS and Windows). Go to Window → Extension Manager → Install Extension.
- Select the .rbz file and approve the install when SketchUp prompts. Open the Vizbase panel from Extensions → Vizbase or from the Vizbase toolbar button.
- Sign in with your Vizbase account. The plugin connects to your credit balance and history, so renders made through the plugin appear in the same dashboard as browser renders.
There are no admin permissions required and no separate authentication beyond your Vizbase account. If your studio uses managed SketchUp installs, the plugin installs per-user — no IT ticket needed.
The capture-to-render workflow
The clearest way to see the plugin in action is to watch a render happen end-to-end. Capture, generate, download — all inside SketchUp 2026.
Capture → generate → download
Open any SketchUp model and position the camera the way you'd frame it for a client presentation. Click the Vizbase toolbar icon. The plugin panel opens; pick a project and it captures the current view — the captured Original appears on the left of the comparison area, and the Generated render appears on the right once it's ready.
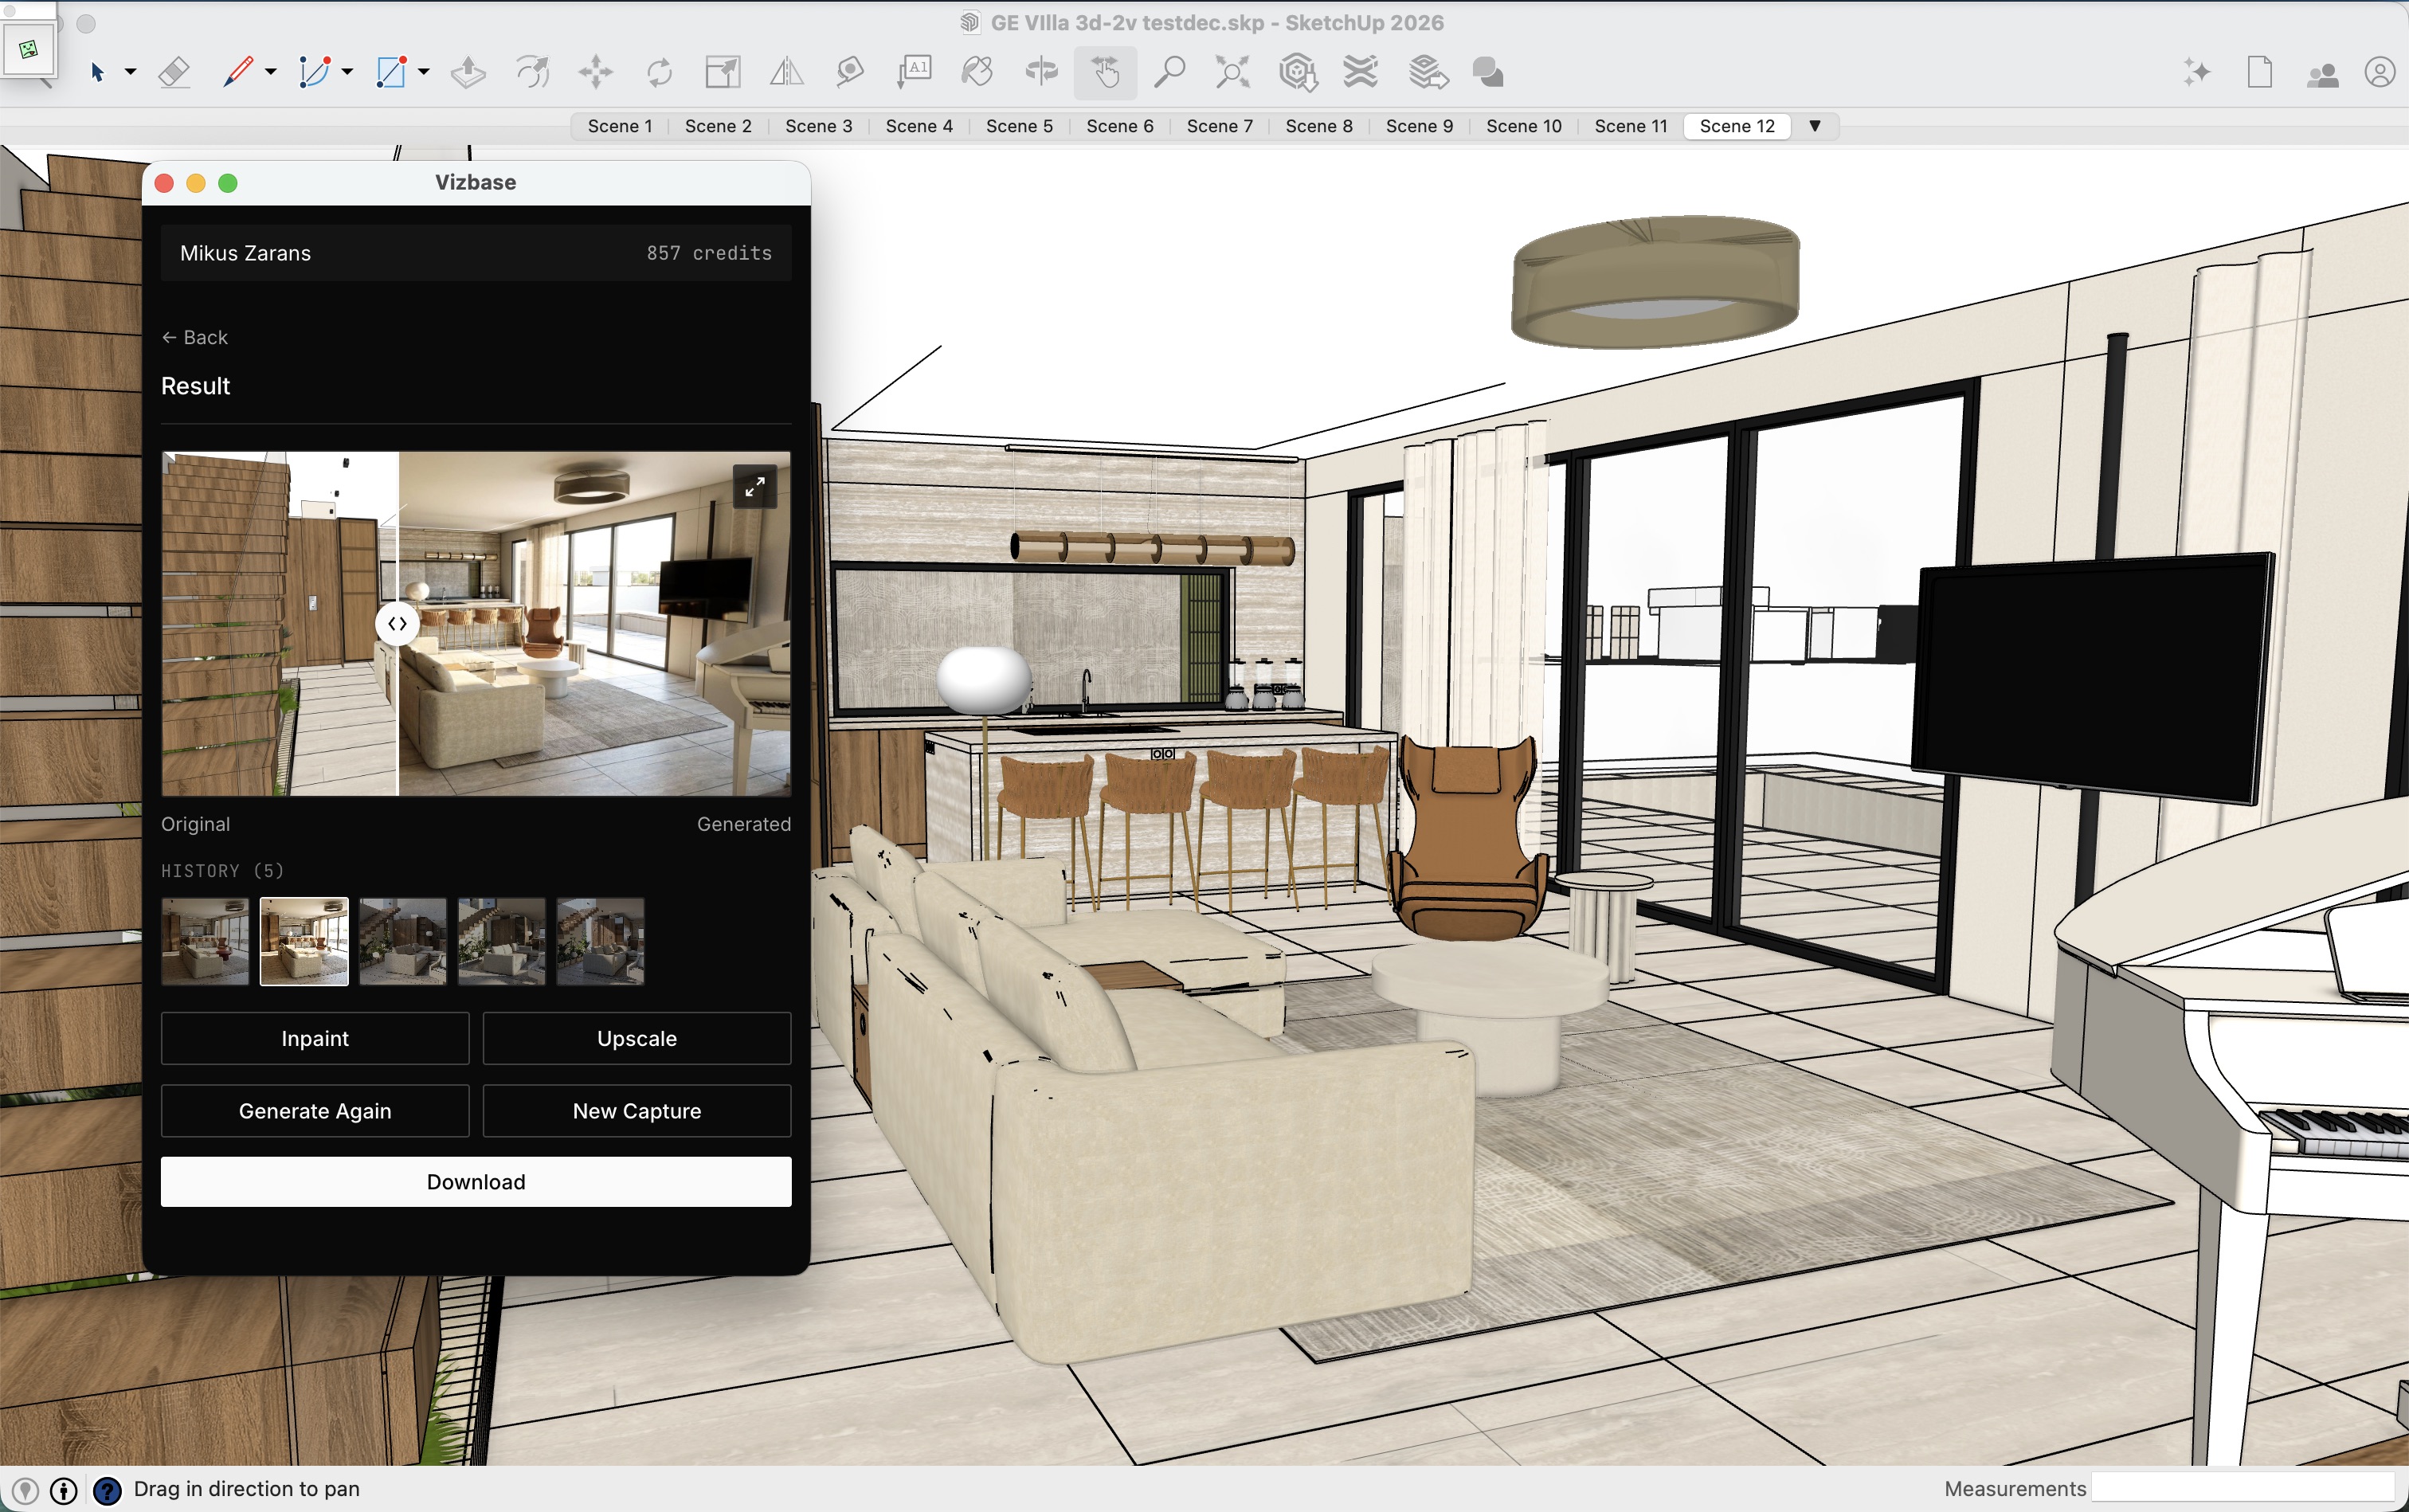
The Vizbase plugin panel inside SketchUp 2026 — Original capture on the left of the panel, Generated render on the right, with credit balance, history, and the Inpaint (now Refine) / Upscale / Generate Again / Download controls.
Describe the materials you want in natural language — “warm oak floors, sage green painted walls, brushed nickel hardware, marble kitchen island” — or accept the auto-detected element list and tweak it. This is the same per-element control that powers the AI kitchen design generator, applied directly inside SketchUp. Pick a render mode and generate: Gen 2.0 is the fastest; in our tests Gen 3.0 took 77–151 seconds per image, and the app quotes about 2–3 minutes for Gen 4.0. The Generated panel updates in place and you can Download, Refine, Upscale, or Generate Again from the same controls.
Each completed render lands in the History row at the bottom of the panel, so you can scroll back through previous attempts without re-running. The history is shared with your Vizbase dashboard, so anything you generate through the plugin is accessible from the web app too.
Refine, upscale, regenerate
Once a render lands, three follow-up actions matter most for real client work.
Refine lets you mark a region of the generated image — say, the cabinets — and describe a new finish. The whole frame is re-rendered, guided by your mark, so glance over the rest of the image before you send it. This is the iteration loop that wins client meetings: “show me the kitchen with white cabinets instead of walnut” is one Refine, not a whole new render setup. It's how interior designers use Vizbase as an AI interior design generator — rapid material variants without restarting from scratch.
Upscale exports the current render at 4K, 6K, or 8K (up to 7,680 px on the long edge) for print and high-DPI client decks. It keeps the image and adds detail as it enlarges it.
Generate Again re-rolls the entire image with the same prompt for a different interpretation. Useful when the first render is 80% there but you want to see two or three other versions before locking in.
Exterior renders use the same workflow
The plugin handles exteriors with the same capture → generate → download loop. The auto-detected element list adapts to the scene — for exteriors, that's typically facade, glazing, roofing, planting, paving, and sky.
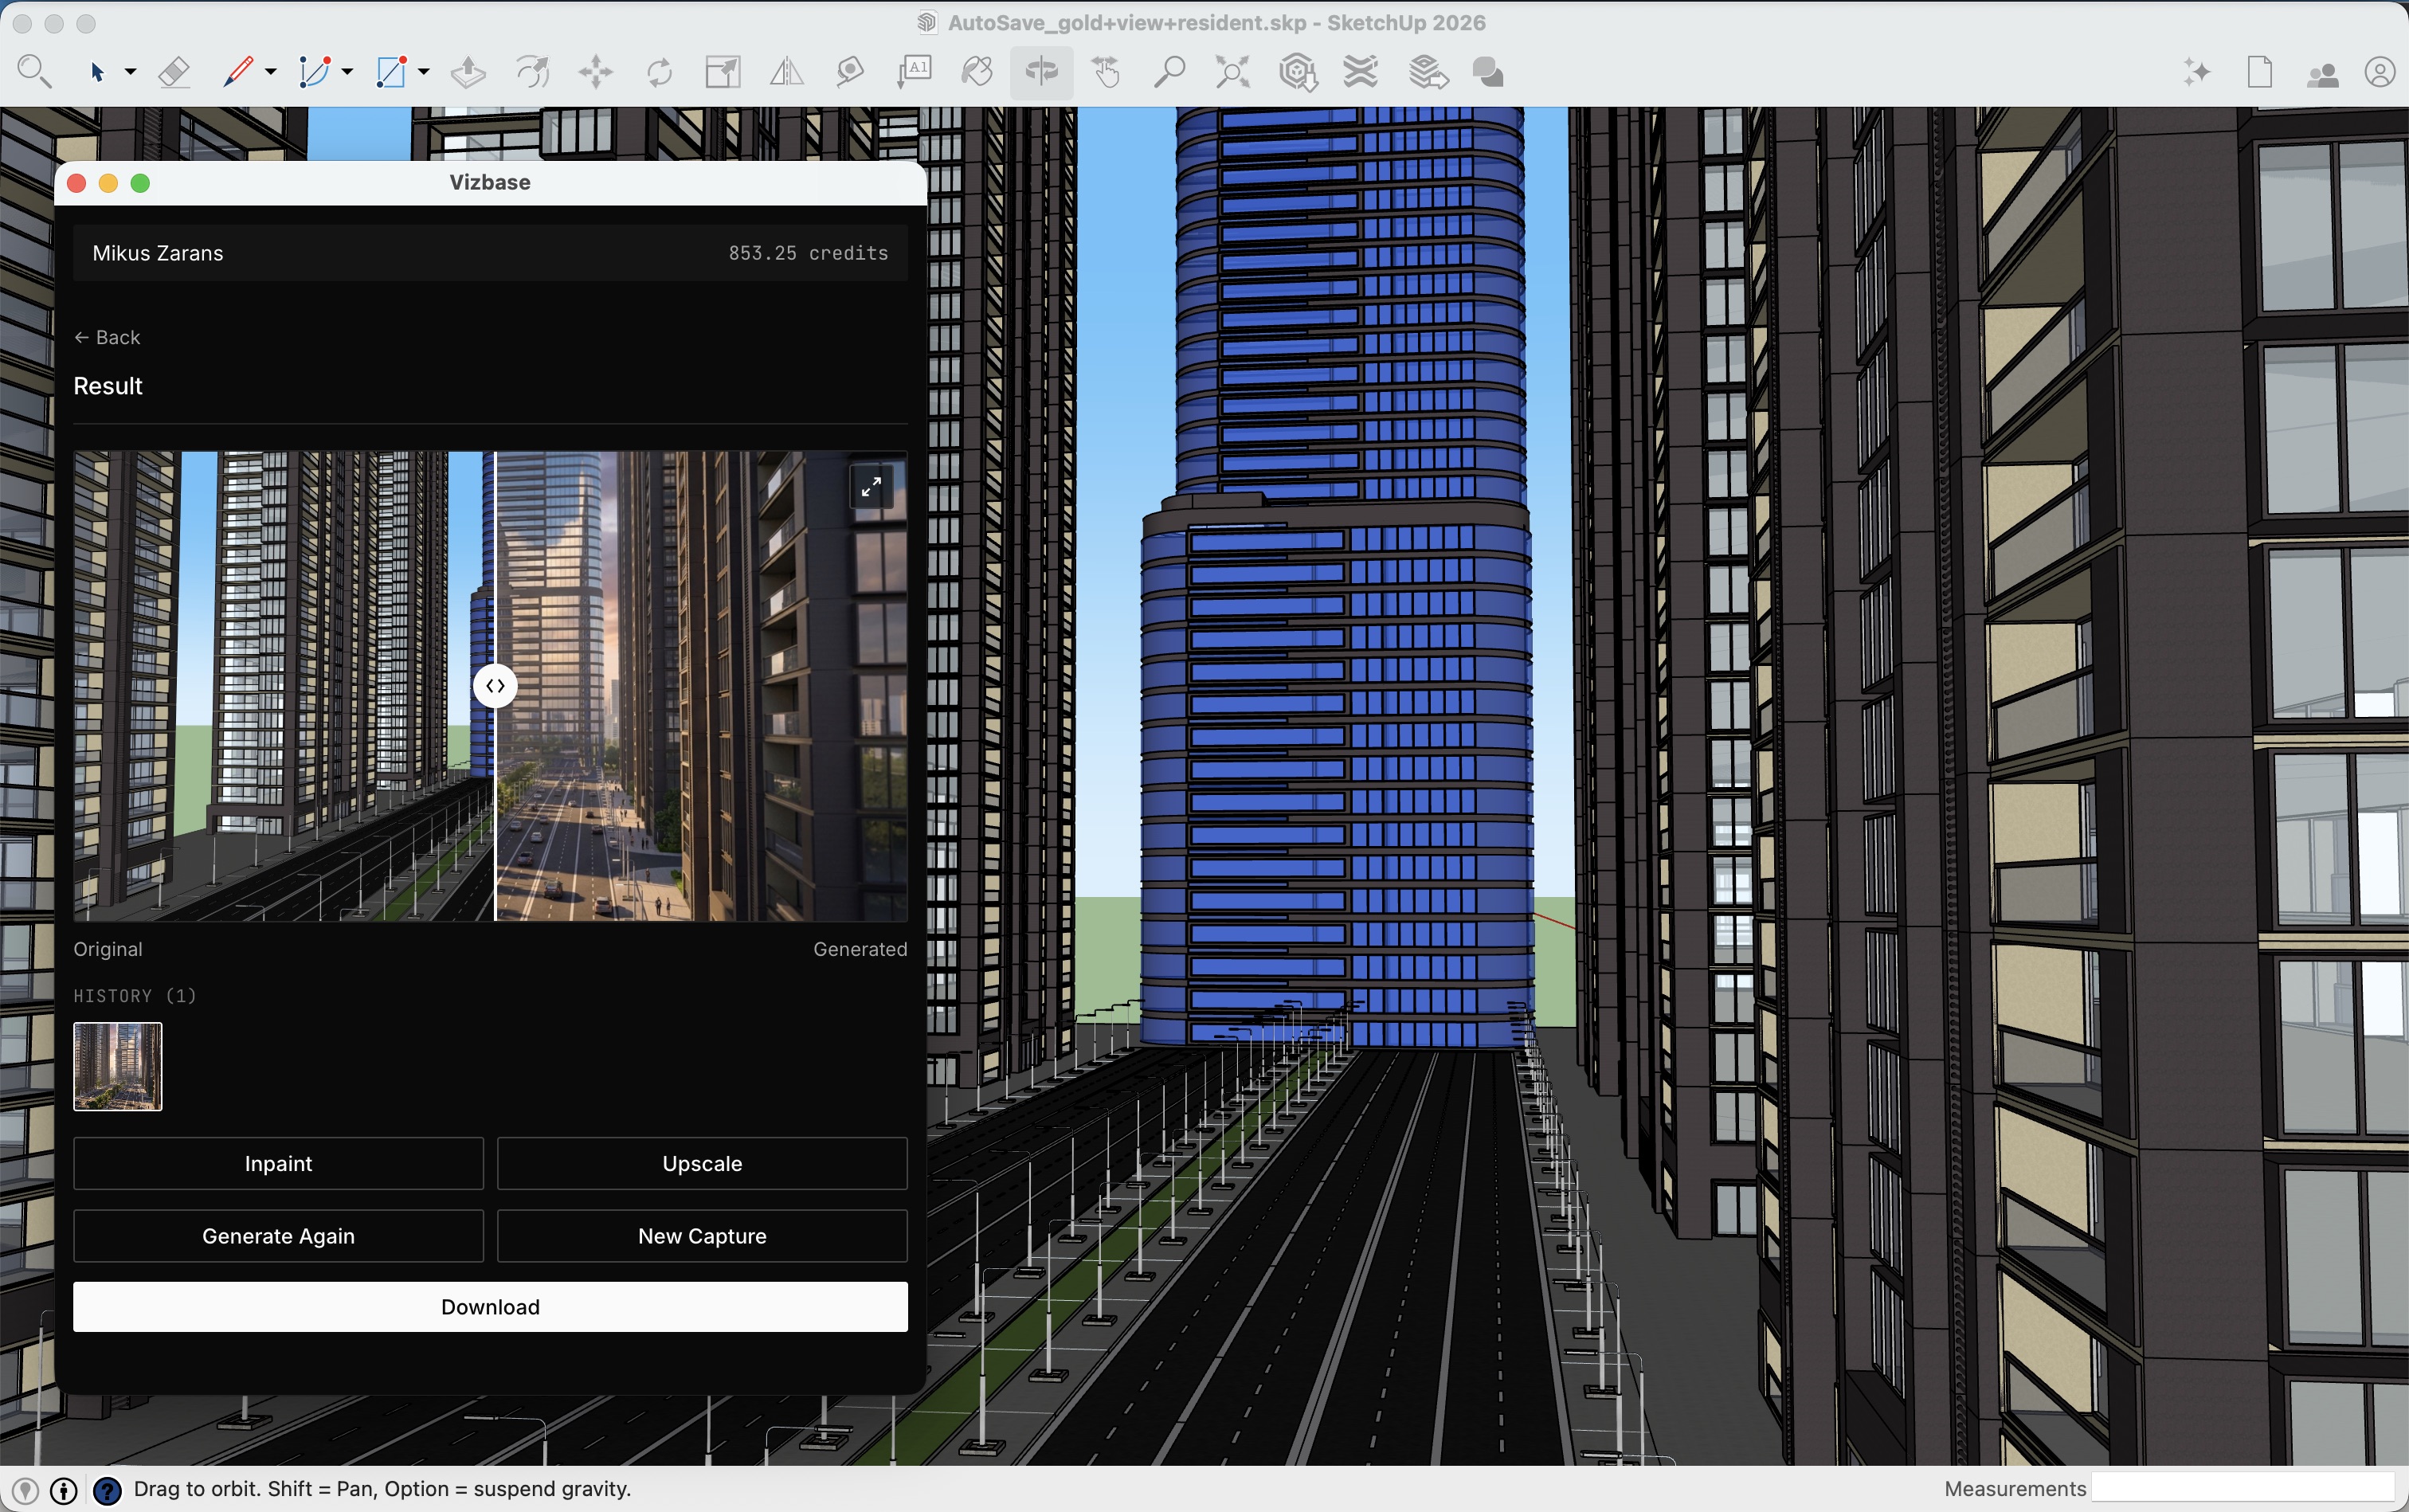
The same plugin, running on a high-rise urban exterior model. The plugin panel sits on top of the SketchUp viewport while the captured view and generated render update in place.
After capturing, set the scene type to Interior or Exterior (Interior is the default; a view added to an existing space takes the space's setting). The materials, lighting, and atmosphere you describe work the same way for both.
Four render modes — when to use which
The plugin offers the same four render modes as the browser app, each suited to a different stage of design work.
Gen 2.0. Stays closest to your source image, including its lighting, and is the fastest mode. 0.5 credits per image. Use it for daily iteration during the design phase when you want to see options quickly.
Gen 2.1. Creative interpretations; works best with reference images. 0.75 credits per image. Use it for stylistic exploration when you want a freer take on materials and mood.
Gen 3.0 and Gen 4.0.Gen 3.0 brings strong material realism and drops drawn SketchUp outlines; in our tests it took 77–151 seconds per image. Gen 4.0 is the newest mode, with photographic light and materials that stay true to the design; the app quotes about 2–3 minutes per render. Both cost 0.75 credits per image. Use them for the images that go in front of a client.
Most projects use Gen 2.0 for early iteration and move to Gen 3.0 or Gen 4.0 for the final presentation render.
Tips for better SketchUp-to-render output
A few small habits separate a generic AI render from one a client signs off on.
Frame the camera like a photographer would.Don't capture from inside-the-wall or from a 100m drone height. Set the camera at standing eye-level (1.6m), at a comfortable focal length (35mm equivalent), and frame the shot the way a real estate photographer would. The plugin's output quality scales directly with how well-composed the source view is.
Be specific about materials.“Modern kitchen” gives you any modern kitchen. “Walnut cabinets with white marble countertop, brushed brass hardware, and a herringbone oak floor” gives you the kitchen in your head. The auto-detected element list is a starting point — overwrite it with the actual finishes you're proposing.
Use Refine instead of regenerating. If a render is 90% there and you want to change one element, mark it and Refine it. Refine still redraws the frame, guided by your mark, but it starts from the render you liked instead of from scratch.
Save your favourite prompts.If you find a material description that consistently delivers good renders for a particular style, keep it in a text file. The Vizbase plugin doesn't yet have native prompt presets, but a clipboard of go-to prompts saves typing.
For a deeper dive into prompt-writing for architectural AI renders, see our SketchUp AI rendering tutorial.
When the plugin wins versus the browser app
The plugin is the right tool when you're working in SketchUp daily and iterating on the same model across multiple sessions. The capture-from-viewport workflow saves real time once you're doing more than a few renders per day.
The browser app at vizbase.aiis the right tool when you want to upload a one-off screenshot, or when you're collaborating with someone who doesn't have SketchUp installed (the free tier and Starter both work in any browser without the plugin). They're the same engine, the same credits, the same dashboard — just different entry points.
Studios with multiple modeling tools — Revit, Rhino, Archicad — often use the browser app for non-SketchUp work and the plugin specifically when working in SketchUp. There's no licensing penalty for using both.
Plugin tier and pricing
The SketchUp plugin is available from the Vizbase Starter tier and above. Starter is €29/month (or €25/month on annual billing) and includes 30 credits per month plus the plugin. Pro at €59/month includes 75 credits, and Studio at €109/month includes 175 credits — the right choice for studios running daily renders across multiple projects.
The free tier (5 credits a month, up to 10 renders) is browser-only. It's the cheapest way to evaluate Vizbase's output quality before stepping up to Starter for the plugin. Annual billing on any paid tier saves around 15%.
Frequently asked questions
Which SketchUp versions does the VizBase plugin support?
The Vizbase SketchUp plugin works with SketchUp 2021 and newer on both macOS and Windows. The plugin ships as a single .rbz file and installs through SketchUp’s built-in Extension Manager, so there’s no separate installer or admin requirement.
Do I need a Pro subscription to use the SketchUp plugin?
The plugin is available from the Vizbase Starter tier and above (€29/month, or €25/month on annual billing). Free-tier accounts can still use Vizbase from the browser by uploading SketchUp screenshots — but the in-viewport plugin is included from Starter. The free tier is the best way to evaluate Vizbase’s output quality before choosing a paid plan.
Do I need a GPU to run the VizBase SketchUp plugin?
No. Vizbase renders run in the cloud, so the plugin only needs to capture and send a view from your SketchUp viewport — no local rendering, no GPU computation. Any laptop that runs SketchUp will run the plugin, including MacBooks without dedicated graphics. This is the main hardware difference between Vizbase and plugin-based real-time engines like D5 Render or Enscape, which render on your local graphics card.
Will the AI render preserve my SketchUp geometry exactly?
Not pixel for pixel. Vizbase keeps the layout, the camera, and the main pieces of your model, but small fixtures and repeated joints (switches, downlights, grout lines) can drift: every render is redrawn from a flat image of the view, not from the model. Gen 2.0 stays closest to the source image, including its lighting; Gen 3.0 and Gen 4.0 give stronger materials and light. Compare every render with your original view and use Refine to put a missing fixture back. When every line has to match the drawings — a planning submission or a construction document — use a traditional renderer.
Can I edit specific parts of a Vizbase render after it generates?
Yes. The plugin includes Refine and Generate Again buttons. Use Refine to mark an element or draw over an area (e.g., the kitchen island) and describe the change; the whole image is re-rendered, guided by your mark, so check the rest of the frame too. Use Generate Again to re-roll the entire image with the same settings for a different interpretation. Upscale exports the render at 4K, 6K, or 8K for print-quality deliverables.
How is the SketchUp plugin different from uploading a screenshot?
Functionally, the plugin saves you the export step and the context-switch — you capture the view from inside SketchUp, and the panel sits next to your viewport so you don’t alt-tab to a browser. It sends a flat image of the current view, just like an uploaded screenshot, so the render quality is the same either way. Workflow-wise, the plugin keeps junior staff in SketchUp rather than asking them to learn a second tool.
Can I use the VizBase plugin alongside V-Ray, Enscape, or D5 Render?
Yes — the Vizbase plugin doesn’t conflict with other SketchUp render plugins. Many studios run V-Ray for final portfolio renders, Enscape for live client walkthroughs, and Vizbase for fast AI iteration during the design phase. Each tool stays in its own SketchUp panel and you can switch between them per project.
How much does a Vizbase render cost in credits?
A Gen 2.0 render uses 0.5 credits per image; Gen 2.1, Gen 3.0, and Gen 4.0 use 0.75 credits. Starter includes 30 credits per month, Pro includes 75, and Studio includes 175. A Refine uses 0.5 credits, and 4K, 6K, and 8K exports use 0.5, 1, and 1.5 credits; downloading at the original size is free.
Try Vizbase free — then upgrade to Starter for the SketchUp plugin
Start with 5 free browser credits to evaluate output quality. When you're ready for the in-viewport plugin, Starter is €29/month and includes the plugin plus 30 credits.
GET STARTED FREE